この記事は PMOB Advent Calendar 2018 - Adventar の9日目の記事です。
Electronとは
このElectronです。
ざっくり言えば「HTML + JavaScriptでアプリのUIとアプリケーションロジックを書くことが出来る」というライブラリです。
chromium ブラウザエンジンの上で色々動くというかなりパワープレイな代物なのですが、割りと小回りの効くことが出来るので、ちょっとしたデスクトップアプリケーションを組むときに便利だったりします。
今回はHello, worldまでと、 Electron 特有のIPCを用いたプロセス間通信についてを書こうと思います。
インストール
node.jsをインストールしたあと、次のコマンドを入力していきます。
$ mkdir hello-electron
$ cd hello-electron
$ npm init -y
すると、 package.json というファイルが以下の内容で作成されます。
{
  "name": "hello-electron",
  "version": "1.0.0",
  "description": "",
  "main": "index.js",
  "scripts": {
    "test": "echo \"Error: no test specified\" && exit 1"
  },
  "keywords": [],
  "author": "",
  "license": "ISC"
}
次に、以下のコマンドを実行して、electron をインストールします。
$ npm install electron
とりあえずこれでインストールは終わりですが、動作確認するまではもう一息必要です。がんばりましょう。
Hello, world
以下のように書いて index.js という名前でワーキングディレクトリに保存します。
ちなみにこのときのファイル名は、 package.json の "main" プロパティに書かれているものと一致させればOKなので、好きな名前にしたければ package.json を編集すると良いでしょう。
const { BrowserWindow, app } = require("electron");

class MyApp {
  constructor() {
    this.mainWindow = null;
    this.mainURL = `file://${__dirname}/index.html`;

    this.app = app;
    this.app.on("window-all-closed", this.onWindowAllClosed.bind(this));
    this.app.on("ready", this.create.bind(this));
    this.app.on("activate", this.onActivated.bind(this));
  }

  onWindowAllClosed() {
    this.app.quit();
  }

  create() {
    // メインウインドウを作成
    this.mainWindow = new BrowserWindow({
      x: 0, // ウインドウの初期位置
      y: 0,
      width: 500, // ウインドウのサイズ
      height: 500,
      minWidth: 500, // ウインドウの最低サイズ
      minHeight: 500
    });
    // 最初に表示するファイルのURLを読み込む
    this.mainWindow.loadURL(this.mainURL);
    // デバッグ用にデベロッパーツールを起動する
    this.mainWindow.webContents.openDevTools();

    this.mainWindow.on("closed", () => {
      this.mainWindow = null;
    });
  }

  onReady() {
    this.create();
  }

  onActivated() {
    if (this.mainWindow === null) {
      this.create();
    }
  }
}

const myApp = new MyApp(app);
次に、 index.html を以下のように書いて同じように保存します。
<!DOCTYPE html>
<html lang="ja">
  <head>
    <meta charset="UTF-8" />
    <meta name="viewport" content="width=device-width, initial-scale=1.0" />
    <meta http-equiv="X-UA-Compatible" content="ie=edge" />
    <title>Document</title>
  </head>
  <body>
    <h1>Hello, world!</h1>
    <p id="app"></p>
    <script src="script/index.js"></script>
  </body>
</html>
package.json の "scripts" というプロパティに、以下のように要素を追記します。
{
  "scripts": {
    "start": "electron ."
  }
}
とりあえずこれで前準備はおしまいです。お疲れ様でした。
さて、いよいよ実行してみます。以下のコマンドを打ち込みましょう。
npm start
以下のようなウインドウが表示されます。おめでとうございました!

右の領域に表示されているのは、 chrome を使ったことのある人なら見たことがあるかもしれない「デベロッパーツール」という、ウェブアプリのデバッグにとても役立つ便利ツールです。不要なら×を押して消してしまいましょう(ウインドウの×を押すとアプリ自体が終了してしまうので注意!)
現在の時間を表示してみる
さて、ここまではよくあるHello, worldですが、今回はもう少しすすめて超簡単な時計アプリを作ってみます。
index.html の body に以下のタグを追記しましょう。
  <body>
    <h1>Hello, world!</h1>
    <!-- このへん -->
    <p id="app"></p>
    <script src="script/index.js"></script>
  </body>
次に、 script ディレクトリの下に index.js という名前のファイルを作り、以下のように書いて保存します。
const elem = document.getElementById("app");

setInterval(() => {
  const date = new Date();
  elem.innerText = date.toString();
}, 100); // ラグを減らすために100ミリ秒ごとに更新するようにする

いいですね!
このように、UIの更新ロジックなどを通常のウェブアプリケーションと同じように作っていく事ができます。
つまり、ReactやVue.js、Angular4などを使うことが出来るということです。
これはとても素晴らしいことで、これらライブラリを触ったことのある人ならば、今まで書いていたウェブアプリケーションの流儀をそのままデスクトップアプリケーション作成に持ち込むことが出来るということです。
今まで書いていたウェブアプリケーションをそのままデスクトップアプリに移植したい場合などにとても役立つでしょう。 (もちろん、それらライブラリを触ったことのない人にとっては少々敷居が上がってしまうかもしれませんが…)
さて、次からは少々発展的な内容を扱います。本格的に Electron を触ってみたいとなった場合は読んでみてください。
マルチプロセスとレンダラープロセスの相互通信
Electron はブラウザの描画プロセスである レンダラープロセス と、JavaScript的な制限のない自由なファイルシステムやネットワークなどの低級寄りな操作が出来る メインプロセス の、2つ以上のマルチプロセスで動作しています。「以上」と書いたのはレンダラープロセスは複数持つことも出来るためです。
このプロセス間通信にはIPCという仕組みを使います。
レンダラープロセスからメインプロセスにデータを送信するためには以下のように書きます。
レンダラープロセス(送信)
// IPC通信を行うために、レンダラープロセス側では ipcRenderer というモジュールを require する
const { ipcRenderer } = require("electron");

// "hello" という文字列と123という整数を送信
ipcRenderer.send("hoge-event", "hello" , 123);
メインプロセス(受信)
// メインプロセス側では ipcMain モジュール
const { ipcMain } = require("electron");

ipcMain.on("hoge-event", (event, args) => {
  // args[0] => "hello", args[1] => 123 が入っている
  console.log("hoge-event!:", args);
});
node.js でよく見られるイベントハンドラ形式です。
次に、メインプロセスからレンダラープロセスにデータを送信するには、と行きたいところですが、レンダラープロセスは複数存在する可能性があるため、全く同じスタイルで書くというわけには行きません。
イベントを送信してきたレンダラープロセスにだけデータを返したいという場合は以下のように書きます。
メインプロセス(送信)
// 以降、require は省略

ipcMain.on("hoge-event", (event, args) => {
  event.sender.send("hoge-event-response", args);
});
レンダラープロセス(受信)
ipcRenderer.on("hoge-event-response", (event, args) => {
  console.log("hoge-event-response!!", args);
});
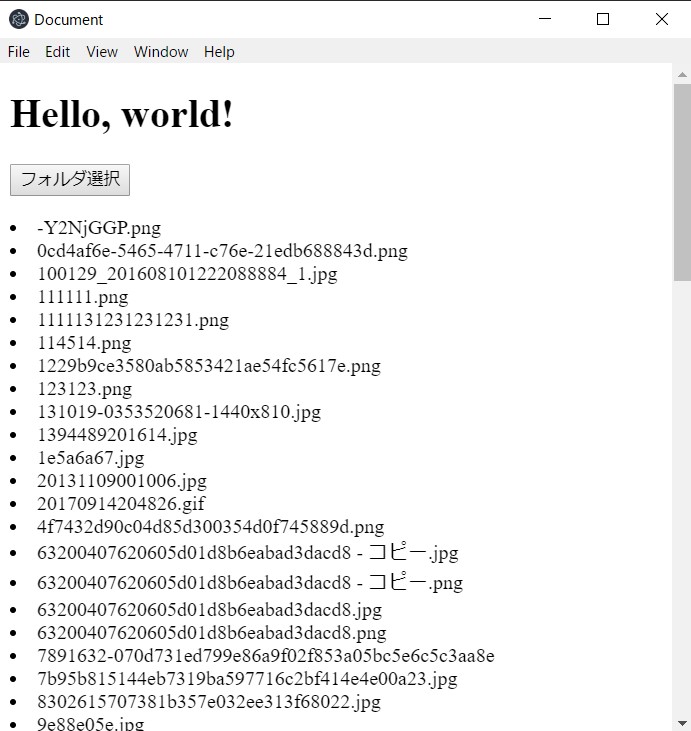
なるほど、簡単そうですね。 試しにディレクトリのファイル一覧を取得して表示するアプリケーションを作ってみます。
index.js
const fs = require("fs");
const { BrowserWindow, app, ipcMain } = require("electron");

class MyApp {
  constructor() {
    this.mainWindow = null;
    this.mainURL = `file://${__dirname}/index.html`;

    this.app = app;
    this.app.on("window-all-closed", this.onWindowAllClosed.bind(this));
    this.app.on("ready", this.create.bind(this));
    this.app.on("activate", this.onActivated.bind(this));
  }

  onWindowAllClosed() {
    this.app.quit();
  }

  create() {
    // メインウインドウを作成
    this.mainWindow = new BrowserWindow({
      x: 0, // ウインドウの初期位置
      y: 0,
      width: 500, // ウインドウのサイズ
      height: 500,
      minWidth: 500, // ウインドウの最低サイズ
      minHeight: 500
    });
    // 最初に表示するファイルのURLを読み込む
    this.mainWindow.loadURL(this.mainURL);

    // IPC通信のイベントハンドラを登録する
    ipcMain.on("file-list-request", (event, directory) => {
      fs.readdir(directory, (_, files) => {
        // fs#readdir を使って、指定されたディレクトリの中にあるファイル一覧を取得して送信
        event.sender.send("file-list-response", files);
      });
    });

    this.mainWindow.on("closed", () => {
      this.mainWindow = null;
    });
  }

  onReady() {
    this.create();
  }

  onActivated() {
    if (this.mainWindow === null) {
      this.create();
    }
  }
}

const myApp = new MyApp(app);
index.html
<!DOCTYPE html>
<html lang="ja">
  <head>
    <meta charset="UTF-8" />
    <meta name="viewport" content="width=device-width, initial-scale=1.0" />
    <meta http-equiv="X-UA-Compatible" content="ie=edge" />
    <title>Document</title>
  </head>
  <body>
    <button id="file">フォルダ選択</button>
    <p id="app"></p>
    <script src="script/index.js"></script>
  </body>
</html>
script/index.js
const { ipcRenderer, remote } = require("electron");

const elem = document.getElementById("app");
const btn = document.getElementById("file");

ipcRenderer.on("file-read-response", (event, args) => {});

btn.onclick = () => {
  // Electron でファイル選択ダイアログを開くときのやり方
  const dirPath = remote.dialog.showOpenDialog(null, {
    properties: ["openDirectory"],
    title: "Select a directory",
    defaultPath: "."
  });

  // メインプロセスに、取得したディレクトリのパスをイベントとして送信
  ipcRenderer.send("file-list-request", dirPath[0]);
};

// IPC通信のイベントハンドラを登録する
ipcRenderer.on("file-list-response", (event, files) => {
  const ul = document.createElement("ul");
  for (const filePath of files) {
    const li = document.createElement("li");
    li.innerText = filePath;
    ul.appendChild(li);
  }
  // DOM に反映
  elem.innerHTML = ul.innerHTML;
});
実行結果

どうやら出来たようです。
おめでとうございます!
こんな感じで、OS寄りなファイル操作を行ったりする場合は、いちいちメインプロセスとやり取りする必要があります。面倒ですね。
これを考えるとVisualStudio Codeとかが恐ろしい作り込みなのがわかったりします。 怖い。
作ったアプリをgithubに貼っておいたので、これをもとにアプリを組んでみたいという場合は参考にしていただければと思います。
というわけで、今回はウェブアプリの仕組みで簡単に?デスクトップアプリを作ることの出来るElectronの紹介と、作り込んでいくと必要になると思われるIPC通信のやり方について軽く解説しました。
これを読んで今日からElectronを始めてもらえたらと思います。
ありがとうございました。